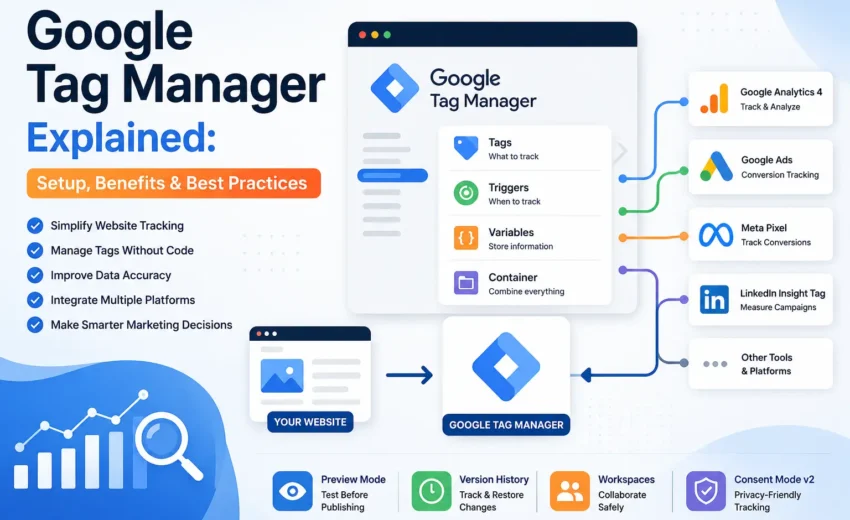

Managing website tracking becomes more complex as your business grows. Most websites use tools like Google Analytics 4 (GA4), Google Ads, Meta Pixel, and other marketing platforms to measure user behavior and campaign performance. Managing each tracking code manually can be time-consuming and increase the risk of implementation errors.
Google Tag Manager (GTM) solves this problem by letting you manage all your tracking tags from a single interface without repeatedly editing your website’s code. Whether you’re tracking page views, button clicks, form submissions, or purchases, GTM simplifies implementation and improves data accuracy.
In this guide, you’ll learn what Google Tag Manager is, how it works, how to set it up, and the best practices for managing website tracking effectively.
What Is Google Tag Manager?
Google Tag Manager (GTM) is a free web-based tool that allows businesses to manage marketing and analytics tags through a centralized dashboard.
A tag is a snippet of code that collects information from your website and sends it to another platform. Instead of installing separate JavaScript snippets for every marketing tool, GTM stores all tracking configurations inside a container. After the container is added to your website, future tracking changes can usually be managed directly from the GTM interface without modifying your site’s code.
Some common tags managed through Google Tag Manager include:
- Google Analytics 4 (GA4)
- Google Ads Conversion Tracking
- Google Ads Remarketing
- Meta Pixel
- LinkedIn Insight Tag
- Microsoft Advertising UET Tag
- Pinterest Tag
- TikTok Pixel
- Hotjar
- HubSpot
- Custom HTML Tags
This centralized approach makes tracking easier to manage and reduces the need for developer support whenever new analytics or advertising tools are introduced.
Why Use Google Tag Manager?
Google Tag Manager offers several advantages for marketers, website owners, and businesses looking to improve their analytics implementation.
Faster Tag Deployment
Without GTM, adding or updating a tracking code often requires editing website files. With Google Tag Manager, most tags can be added or updated directly through the GTM interface, making campaign launches and tracking updates much faster.
Centralized Tracking Management
Instead of maintaining tracking scripts across multiple website files, GTM stores everything inside a single container. This makes it easier to organize tags, remove outdated scripts, and maintain a cleaner tracking setup.
Supports Multiple Marketing Platforms
Although developed by Google, GTM supports hundreds of marketing and analytics tools, including:
- Google Analytics 4
- Google Ads
- Meta Pixel
- LinkedIn Insight Tag
- Microsoft Advertising
- Pinterest Tag
- TikTok Pixel
- Hotjar
- HubSpot
Managing these tools from one interface reduces complexity and improves consistency across your marketing campaigns.
How Google Tag Manager Works
Google Tag Manager follows a straightforward workflow:
Website Visitor → GTM Container → Trigger → Tag → Analytics or Marketing Platform
Here’s how each component works together.
Step 1: Install the GTM Container
When you create a Google Tag Manager account, Google provides two code snippets:
- A JavaScript snippet placed inside the <head> section.
- A <noscript> snippet placed immediately after the opening <body> tag.
After these snippets are installed, the GTM container becomes the central hub for managing all future tracking configurations.
Step 2: Create Tags
A Tag defines what information should be sent to another platform.
Common examples include:
- GA4 Configuration Tag
- Google Ads Conversion Tag
- Meta Pixel
- LinkedIn Insight Tag
- Custom HTML Tag
Each tag performs a specific task, such as tracking page views, recording conversions, or measuring user interactions.
Step 3: Configure Triggers
A Trigger tells Google Tag Manager when a tag should fire.
Examples include:
- Page Views
- Button Clicks
- Form Submissions
- Scroll Depth
- File Downloads
- Purchase Events
- Custom Events
For example, a Google Ads conversion tag can be configured to fire only after a visitor submits a contact form or completes an online purchase.
Step 4: Use Variables
Variables provide additional information that tags and triggers use while collecting data.
Common variables include:
- Page URL
- Page Title
- Click Text
- Click Classes
- Form ID
- Transaction Value
- Product ID
- Currency
- Referrer
Using variables allows GTM to capture detailed information about each interaction instead of simply recording that an event occurred.
What Is the Data Layer?
The Data Layer is one of the most important features of Google Tag Manager.
It is a JavaScript object that stores structured information about your website and user interactions. Instead of reading data directly from the page each time an event occurs, GTM retrieves information from the Data Layer and passes it to platforms like Google Analytics 4, Google Ads, and Meta Pixel.
For example, an eCommerce website can send information such as:
- Transaction ID
- Product Name
- Product Category
- Order Value
- Currency
- Customer Type
Using a properly configured Data Layer improves tracking accuracy, simplifies advanced implementations, and provides more reliable data for reporting and campaign optimization.
Understanding GTM Components
Google Tag Manager is built around four core components that work together to collect and send data.
Container
A Container is the foundation of GTM. It stores all your tags, triggers, variables, folders, workspaces, and version history. Once the container code is installed on your website, you can manage most tracking updates directly from the GTM interface.
Tags
A Tag is a tracking configuration that sends information to another platform.
Common examples include:
- Google Analytics 4 Configuration
- Google Analytics 4 Events
- Google Ads Conversion Tracking
- Google Ads Remarketing
- Meta Pixel
- LinkedIn Insight Tag
- Microsoft Advertising UET
- Pinterest Tag
- TikTok Pixel
- Custom HTML Tags
Triggers
A Trigger determines when a tag should fire.
Examples include:
- Page Views
- Button Clicks
- Form Submissions
- Scroll Depth
- File Downloads
- YouTube Video Events
- Purchase Events
- Custom Events
Variables
Variables provide additional information for tags and triggers. They can capture details such as:
- Page URL
- Page Title
- Click Text
- Click URL
- Form ID
- Transaction Value
- Product ID
- Referrer
- Data Layer Variables
Together, these components allow GTM to collect detailed information about user interactions while keeping your tracking setup organized.
What Can You Track Using Google Tag Manager?
Google Tag Manager can track almost any meaningful interaction on your website.
Website Engagement
- Page Views
- Scroll Depth
- Outbound Link Clicks
- Internal Link Clicks
- Search Activity
Lead Generation
- Contact Form Submissions
- Newsletter Sign-ups
- Quote Requests
- Appointment Bookings
- WhatsApp Button Clicks
- Phone Number Clicks
eCommerce Tracking
- Product Views
- Add to Cart
- Begin Checkout
- Purchases
- Refund Events
Content Engagement
- PDF Downloads
- eBook Downloads
- Video Plays
- File Downloads
Tracking these interactions helps businesses understand customer behavior, optimize marketing campaigns, and measure conversions more effectively.
How to Set Up Google Tag Manager
Setting up GTM is straightforward if you follow these steps.
Step 1: Create a GTM Account
Sign in to Google Tag Manager using your Google account and create a new account for your business.
Step 2: Create a Container
Create a container for your website and choose Web as the target platform. Google will generate your unique GTM Container ID.
Step 3: Install the Container Code
Add the JavaScript snippet inside the <head> section and the <noscript> snippet immediately after the opening <body> tag of your website.
Step 4: Create Your First Tag
Start by creating a tag for tools such as:
- Google Analytics 4
- Google Ads Conversion Tracking
- Meta Pixel
- LinkedIn Insight Tag
Step 5: Add a Trigger
Choose when the tag should fire—for example:
- All Pages
- Button Click
- Form Submission
- Purchase Event
Step 6: Test Before Publishing
Use Preview Mode to verify that your tags and triggers work correctly. You can also validate events using GA4 DebugView, Meta Events Manager, and Tag Assistant.
Step 7: Publish Your Container
Once testing is complete, publish the container and save it with a meaningful version name for future reference.
Best Practices
Follow these best practices to maintain a clean and reliable GTM setup:
- Use clear names for tags, triggers, and variables.
- Organize assets using folders.
- Test every change before publishing.
- Review events in GA4 DebugView.
- Remove unused or duplicate tags regularly.
- Create a new version before every release.
- Restrict publishing permissions.
- Implement Google Consent Mode v2 when required.
Final Thoughts
Google Tag Manager is an essential tool for modern digital marketing. It simplifies website tracking, reduces dependence on developers, and supports integrations with platforms like Google Analytics 4, Google Ads, Meta Pixel, and LinkedIn Insight Tag.
By understanding Containers, Tags, Triggers, Variables, and the Data Layer, you can build a scalable tracking system that provides accurate insights into user behavior. Combined with features like Preview Mode, Version History, Server-side Tagging, and Google Consent Mode v2, GTM helps businesses improve data quality while adapting to evolving privacy standards.
Whether you’re running a business website, an eCommerce store, or managing client campaigns, learning Google Tag Manager is a valuable investment that supports better reporting, smarter marketing decisions, and long-term growth.
Alfik P S
hi